Bandage Selector Tool
Enter your abrasion details and click "Analyze and Recommend" to get a personalized bandage recommendation.
Select a bandage type to view detailed information about its features and uses.
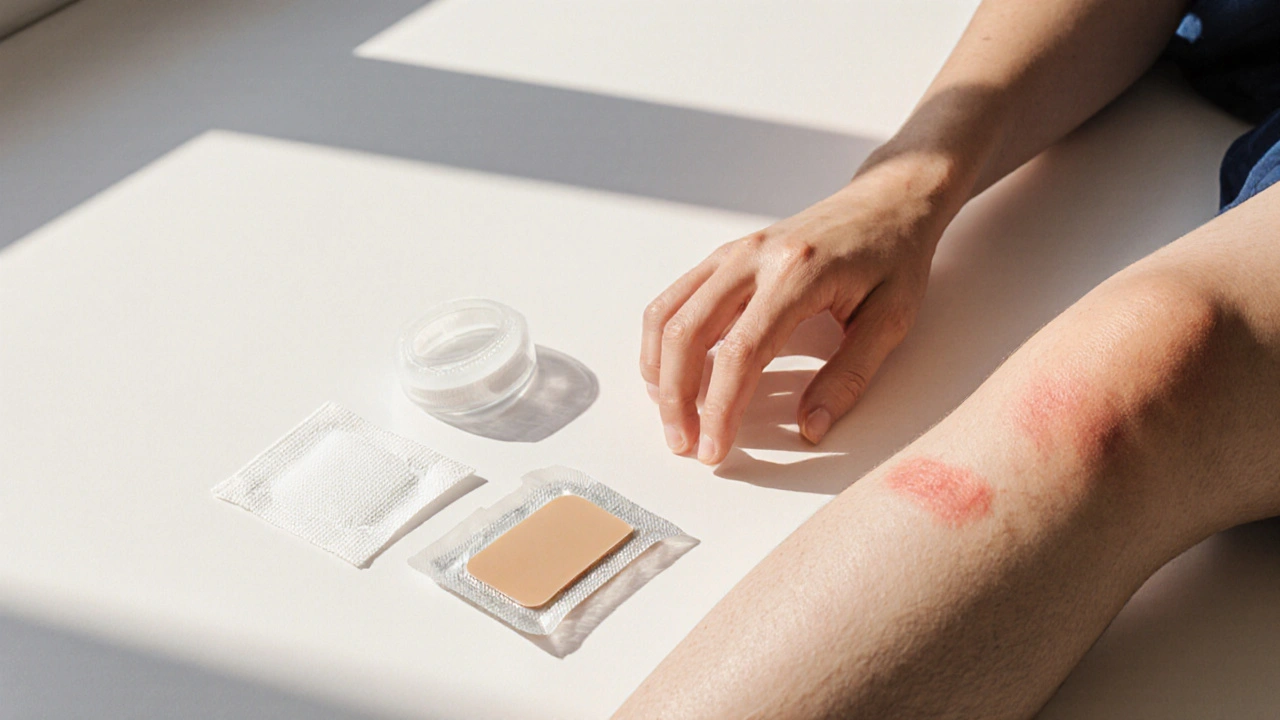
Got a scrape that’s bleeding a bit and wondering which bandage will actually help it heal rather than just stick to your skin? Picking the right covering isn’t rocket science, but it does need a bit of know‑what‑you‑need. This guide walks you through the key choices, so you can match the perfect bandage to any abrasion you face.
Key Takeaways
- Identify your abrasion’s depth and size before you shop.
- Match the bandage’s breathability, adhesive strength, and waterproof rating to the wound’s environment.
- Use sterile gauze for heavy bleeding, hydrocolloid for low‑exudate scrapes, and waterproof film for active‑day outings.
- Follow a simple three‑step application routine to keep the bandage in place and the wound clean.
- Avoid common pitfalls like re‑using old dressings or choosing a strip that’s too tight.
What Is an Abrasion?
An Abrasion is a wound caused by friction that scrapes away the outer layers of skin. Most abrasions are superficial, affecting only the epidermis, but deeper scrapes can reach the dermis and bleed more heavily. They’re classified by:
- Superficial: thin, little to no bleeding, heals in a few days.
- Partial‑depth: breaches the epidermis, may ooze clear fluid, needs protection for 5‑7 days.
- Deep: reaches the dermis, bleeds, and benefits from absorbent dressings.
Knowing the depth guides you to the right bandage type.
Common Bandage Types and When to Use Them
Below are the most popular bandage families, each with a quick “best‑for” note. The first mention of each entity includes Schema.org markup.
- Sterile gauze pad a soft, absorbent square that soaks up blood and exudate. Ideal for deep or heavily bleeding abrasions because it cushions the wound and prevents crusting.
- Hydrocolloid dressing a gel‑forming pad that creates a moist seal. Best for low‑exudate, partial‑depth scrapes that you want to heal without frequent changes.
- Medical adhesive tape thin, breathable strip used to secure gauze or pads. Works when you need a light hold and want the dressing to stay flexible.
- Waterproof film dressing transparent, airtight layer that shields wounds from water. Perfect for outdoor activities or showering without exposing the abrasion.
- Antimicrobial dressing contains agents like silver or iodine to reduce infection risk. Choose for bruised or dirty abrasions where infection is a concern.
- Foam dressing thick, cushioning pad that absorbs moderate exudate. Good for larger surface‑area scrapes that need extra padding.
- Transparent film dressing ultra‑thin, see‑through sheet that lets you monitor healing. Use when you want to keep an eye on the wound without removing the bandage.
How to Pick the Right Bandage - Decision Criteria
Think of the selection process as a checklist. Each factor narrows down the options until you land on the perfect match.
- Size & shape: Measure the abrasion’s length and width. A dressing that’s too small won’t cover the edges; too large can trap moisture.
- Breathability: For wounds that need oxygen (most superficial abrasions), choose a breathable pad like gauze or foam. For waterproof needs, sacrifice breathability.
- Adhesive strength: If the bandage will be on a joint (knees, elbows), pick a stronger adhesive. For delicate skin, go with a gentle, silicone‑based strip.
- Waterproof rating: Planning a swim or a rainy hike? Waterproof film or Tegaderm‑style dressings keep water out.
- Antimicrobial property: If the abrasion was caused by a dirty surface, consider a dressing with silver or iodine.
- Flexibility & conformability: Curved areas (ankles, wrists) benefit from flexible foam or hydrocolloid that molds to the skin.
Side‑by‑Side Comparison
| Bandage Type | Breathability | Waterproof | Adhesive Strength | Best for Abrasion Depth |
|---|---|---|---|---|
| Sterile gauze pad | High | No | Medium (tape needed) | Deep or bleeding |
| Hydrocolloid dressing | Low‑moderate | Partial | Medium (self‑adhesive) | Partial‑depth, low exudate |
| Medical adhesive tape | High | No | High | Securing other pads |
| Waterproof film dressing | Low | Full | Medium | Any depth, wet environments |
| Antimicrobial dressing | Medium | Partial | Medium | Dirty or infection‑risk abrasions |
| Foam dressing | Medium | No | Medium | Large surface, moderate exudate |
| Transparent film dressing | Low | Partial | Low‑medium | Monitoring healing, shallow cuts |
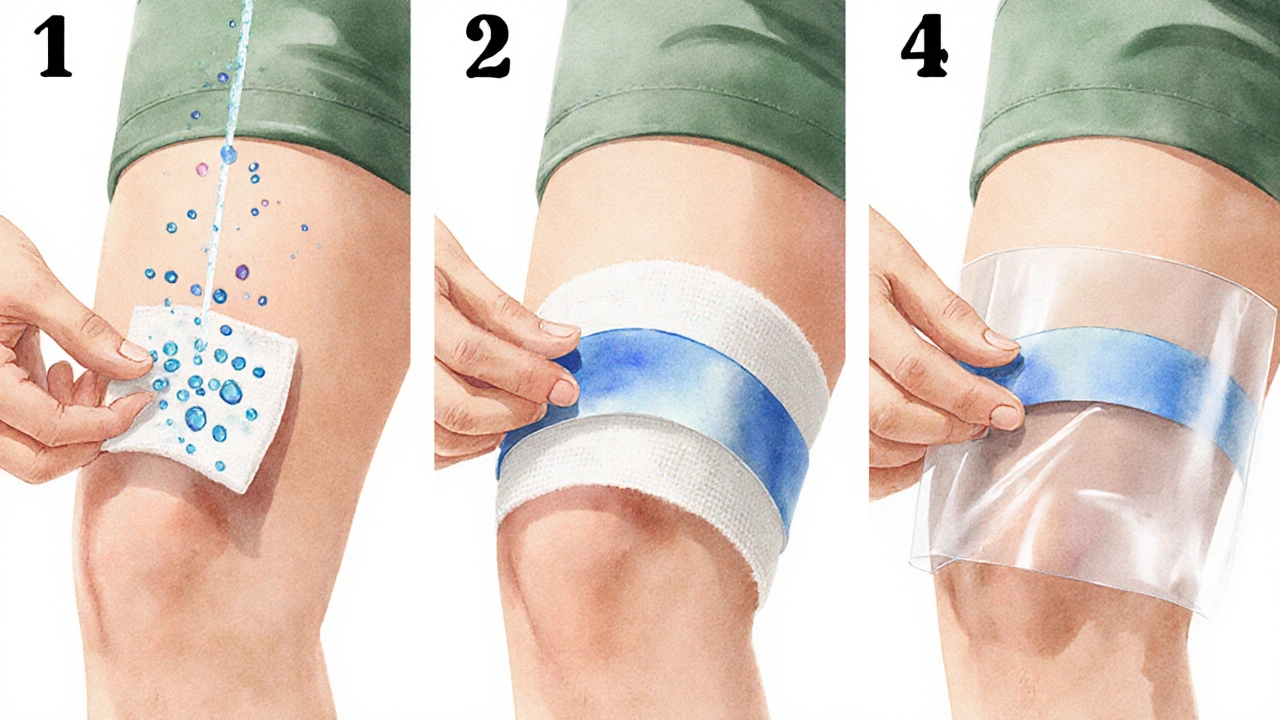
Step‑by‑Step: Applying the Right Bandage
- Clean the wound. Gently rinse with saline or clean water. Pat dry with a sterile gauze pad-don’t rub.
- Choose the size. Lay the dressing flat; it should extend at least ½‑inch beyond each edge of the abrasion.
- Place the dressing. Center it over the wound. For gauze pads, secure with medical adhesive tape. For self‑adhesive pads (hydrocolloid, film), peel back the backing and smooth it down.
- Press from the center outward to eliminate air bubbles.
- For joint areas, wrap gently and ensure the bandage conforms without creasing.
- Check the seal. Run a fingertip over the edges; they should feel snug but not tugging the skin.
- Change as needed. Replace gauze when it’s soaked, hydrocolloid every 3‑5 days, and waterproof film anytime it peels.
Following these steps reduces infection risk and keeps the bandage for abrasion effective throughout the healing phase.
Common Mistakes and How to Avoid Them
- Re‑using old dressings. Even if the pad looks clean, its adhesive loses strength and can harbor bacteria.
- Choosing the wrong size. Too small leaves edges exposed; too big traps moisture and slows healing.
- Applying a non‑breathable dressing on a low‑exudate wound. It creates a soggy environment that can delay tissue regeneration.
- Skipping skin prep. Oil or dirt under the bandage reduces adherence and may cause skin irritation.
- Using overly strong adhesive on delicate skin. This can cause skin tears when removed. Opt for silicone‑based strips for elderly or pediatric patients.
Pro Tips for Long‑Term Comfort
- Keep a small first‑aid kit in your bag that includes sterile gauze, self‑adhesive hydrocolloid pads, and waterproof film strips.
- If you need to wear the bandage for several days, change it at least every 48hours to inspect for signs of infection.
- For kids who dislike sticky stuff, cover the bandage with a thin layer of non‑stick gauze before securing with tape.
- When swimming, double‑seal the area with a waterproof patch over the first dressing to add extra protection.
Frequently Asked Questions
How often should I change a gauze bandage on a deep abrasion?
Replace the gauze whenever it becomes saturated with blood or clear fluid-usually every 12‑24hours for deep wounds. Changing too early can disrupt clot formation; waiting too long promotes bacterial growth.
Can I use a hydrocolloid dressing on a heavily bleeding scrape?
No. Hydrocolloid dressings are designed for low‑exudate wounds. For heavy bleeding, start with a sterile gauze pad to absorb blood, then cover with a secondary adhesive if needed.
Is waterproof film dressing safe for everyday use?
Yes, as long as you monitor the wound daily. The film lets you see the healing progress and prevents water entry, making it ideal for showers or outdoor activities.
What signs indicate an abrasion is infected?
Look for increasing redness beyond the wound edge, swelling, a foul smell, pus, or a fever over 100.4°F (38°C). Switch to an antimicrobial dressing and see a healthcare professional promptly.
Can I apply a bandage over a tattoo that’s just been inked?
Yes, but use a breathable, non‑stick gauze and a gentle adhesive. Keep it on for the first 24‑48hours, then follow the tattoo artist’s after‑care instructions.
Choosing the right bandage isn’t a guesswork game; it’s a quick check of the wound’s needs against the dressing’s features. Follow the checklist, apply the dressing correctly, and you’ll see faster, cleaner healing.
Francisco Garcia
I love how the guide breaks down the different bandage types and matches them to specific abrasion scenarios; it makes picking the right one feel less like a guess and more like a quick science experiment. The checklist format is especially handy when you’re in the middle of a hike and need to decide fast. I also appreciate the tip about keeping a small first‑aid kit in your bag; that’s a habit I’ve been trying to build lately.
Overall, the article does a solid job of turning a mundane topic into something practical and easy to remember.
Patrick Renneker
Whilst the article offers a commendable overview of bandage selection, one must not overlook the inherent limitations of such categorical recommendations. The assertion that a waterproof film dressing is universally appropriate for any wet environment, for instance, fails to consider the detrimental effects of reduced transepidermal oxygen diffusion on wound granulation. Moreover, the suggestion to employ hydrocolloid dressings on low‑exudate wounds neglects the potential for maceration when ambient humidity is elevated. A more nuanced discussion incorporating patient comorbidities, such as peripheral vascular disease, would have rendered the guide substantially more robust. In essence, the piece, though well‑intentioned, borders on oversimplification.
KAYLEE MCDONALD
Use sterile gauze for heavy bleeding and change it every 12‑24 hours; anything else just slows healing.
Alec McCoy
Hey folks, if you’re new to first‑aid kits, start by grabbing a couple of sterile gauze pads, some self‑adhesive hydrocolloid strips, and a roll of waterproof film. When you’re out on a bike trail and scrape your knee, a quick rinse with clean water followed by a snug hydrocolloid pad can keep the wound moist and pain‑free for days. For those that love the outdoors, layering a waterproof film over a gauze pad gives you the best of both worlds-absorption and protection from rain or a sudden dip in a lake. Remember to press the edges of any adhesive dressing from the centre outward to avoid air bubbles; it makes the bandage stay put longer. And most importantly, don’t forget to check the dressing at least every 48 hours for signs of infection.
Aaron Perez
The very act of selecting a bandage, though seemingly trivial, reveals a cascade of physiological and psychological considerations that most laypersons overlook.
One must first contemplate the microenvironment of the abrasion, for the balance between moisture retention and aeration dictates the trajectory of epithelial migration.
When the wound exudes copious serous fluid, a high‑absorbency dressing such as sterile gauze or foam becomes not merely convenient but imperative; otherwise, the excess fluid may accumulate, creating a nidus for bacterial proliferation.
Conversely, in a low‑exudate scenario, the virtues of a hydrocolloid dressing shine, as its gel‑forming properties maintain a moist milieu conducive to keratinocyte activity.
Yet the hydrocolloid’s semi‑impermeable nature imposes a trade‑off, limiting gas exchange, and thus its application should be avoided in overly humid climates where maceration looms.
The waterproof film dressing, lauded for its impermeability, paradoxically introduces the risk of hypoxia beneath the occlusive layer, a condition that can retard granulation tissue formation.
Therefore, the decision matrix must weigh not only the external environment-rain, sweat, or aquatic exposure-but also the intrinsic properties of the patient’s skin, such as fragility, age‑related thinning, or predisposition to dermatitis.
For elderly individuals, a gentle silicone‑based adhesive or a transparent film, applied with meticulous care, prevents the dreaded iatrogenic skin tears that often accompany aggressive tapes.
In the realm of infection control, antimicrobial dressings saturated with silver ions or iodine offer a chemical shield, yet their cytotoxic potential mandates judicious use, especially on deep wounds where fibroblast viability is paramount.
Moreover, the psychological comfort provided by a visible, transparent dressing cannot be dismissed; patients often derive reassurance from being able to monitor healing progress without stripping the bandage.
From a cost‑effectiveness perspective, sterile gauze remains the most economical option, readily available in most households, whereas specialty dressings such as hydrocolloids or antimicrobial pads may impose a financial burden on underserved populations.
The clinician’s responsibility, therefore, extends beyond mere recommendation; it encompasses education about proper application techniques-cleaning, sizing, securing, and scheduled replacement-to maximize therapeutic outcomes.
An often‑overlooked step is the pre‑application skin preparation; any residual oil or debris compromises adhesive integrity, leading to premature detachment and subsequent contamination.
In summary, the optimal bandage is not a one‑size‑fits‑all artifact but a tailored solution derived from a systematic appraisal of wound depth, exudate volume, environmental exposure, and patient‑specific factors.
By adhering to this comprehensive framework, both lay caregivers and seasoned practitioners can ensure that the chosen dressing accelerates healing, mitigates infection risk, and preserves patient dignity.
William Mack
Quick tip: keep a pocket‑size roll of waterproof film-you’ll thank yourself after the next shower.
Evan Riley
Don’t be fooled by the glossy marketing; most “waterproof” dressings contain micro‑plastics that leach chemicals into the wound, and the big medical manufacturers profit while we suffer hidden infections.
Nicole Povelikin
i guess the article is ok but i think they missed the point that most people dont even have time to read checklists, they just slap on any old bandage and move on.
Michelle Weaver
For anyone unsure which product to buy, start with a sterile gauze pad for deep cuts then add a waterproof film if you’ll be swimming 😊 This two‑step approach covers most everyday scenarios.
John Keough
That two‑step method works great for me on weekend hikes; after a quick rinse I apply a gauze pad, then seal it with film and I never worry about a sudden rainstorm.
Graham Smith
I noticed a few punctuation slips in the guide-specifically missing commas after introductory phrases-and some inconsistent capitalization of “bandage” versus “Bandage”.
Jeremiah Morgan
It is heartening to see such a thorough and accessible resource; I encourage all readers to adopt these practices, as diligent wound care truly fosters swift recovery.
nina greer
The exposition, while adequate, lacks the nuanced gravitas befitting a medical treatise.
Montague Tilmen
Our emergency kits should prioritize American‑made, rugged bandages that stand up to real combat, not cheap imports that fall apart after a single wash.